When Metal Lets Us Down
It’s rare for an engine, propeller or airframe to fail catastrophically in flight. But when one does, more often than not, the culprit is metal fatigue. To make intelligent maintenance decisions, every aircraft owner needs a basic understanding of how metal behaves … and why it fails. AVweb’s Mike Busch offers a primer on the subject.

 Metalfatigue isn't a subject that usually keeps me awake at night. For most of the 30-odd yearsduring which I've been an aircraft owner, I figured it was a subject of interest mainly tometallurgists and aeronautical engineers and other Ph.D. types, not to mere mortalaircraft owners like me.
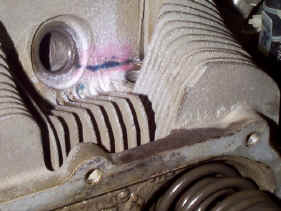 Figure 1 — Under dye penetrant, the fatigue crack in my cylinder head became painfully obvious. (Click on any image in this article for a higher-resolution version.) |
However, my interest in the subject was rekindled recently by a rash of maintenanceproblems I encountered with my 1979 T310R. The problems started showing up during myannual inspection last March. I did a compression check on my two 1000-hours-SMOH engines,came up with mid-to-high 70s on all twelve cylinders, and figured my jugs were doing justfine. But within an hour of starting the inspection, Phil Kirkham — my IA for this year'sordeal — called me over and pointed to a nearly imperceptible blue stain in the vicinityof the upper spark plug boss on the #5 cylinder of the right engine.
"Looks like we might have a cracked head," Phil told me.
"Boy, your eyes are sure better than mine," I replied. "I can justbarely see what you're talking about."
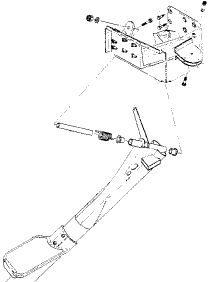 Figure 2 — When I removed the cabin step to re-bush it during the annual, I discovered a nasty fatigue crack in the magnesium support casting. |
"One way to know for sure," Phil said, reaching for an aerosol can of dyepenetrant. Within a few minutes, there was no question that Phil was right. The head wasdefinitely cracked, and the cylinder was trash. This was something of a watershed eventfor me, since the twelve cylinders on my engines were the original twelve that rolled outof the Cessna Wallace Plant in 1979. They'd survived 20 years, 3,000 hours, and one majoroverhaul. But now, one of them had let me down. Could the other eleven be far behind?
Given that the engines were only 400 hours from published TBO, I decided theappropriate course of action was to find a decent serviceable cylinder that would get meto major overhaul, at which time it was pretty clear that all twelve jugs would have to bereplaced with new ones. I phoned Ken Tunnell at Ly-ConAircraft Engines in Visalia, Calif., explained my situation, and he fixed me up with anice-looking reconditioned jug for about half the cost of a new one. Ken runs a greatengine shop.
I figured that the worst was over. But later in the annual, I discovered anotherserious problem. I'd removed my 310's retractable cabin step from the airframe in order toreplace its worn pivot bushings. With the step removed, I got a good look at the bigmagnesium step support casting, and didn't like what I saw one bit. The casting had aserious fatigue crack that had grown to the point that the part was on the verge offracturing in two. This one didn't require dye penetrant — it was painfully obvious, evento my untrained eye. Cessna wanted $900 for a new one, but I managed to get mineweld-repaired (which is tricky business with magnesium, as you might imagine).
It Ain't Over Yet
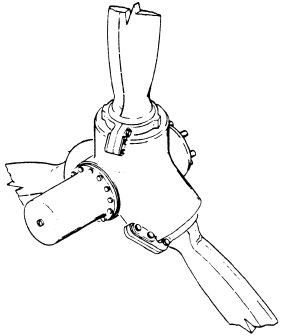 Figure 3 — My right prop started throwing red-dyed oil from the #2 blade retention area. The prop shop suspected a fatigue crack in the blade retention nut. |
After a month of wrench swinging that seemed like it would never end, I finally got theairplane back together. Phil signed off the annual and returned the plane to service, andI looked forward to 11 months of hassle-free flying. But it was not to be.
In late April, I was flying up to Bend, Ore., to visit the Lancair Columbia 300factory and have a close look at the newly certificated 300-hp composite speedster. Aboutan hour into the three-hour flight, I noticed a thin reddish streak starting to develop onthe top of the right engine nacelle. Unless it was bug blood, red fluid in that locationcould only come from one place: my red-dyed-oil-filled propeller hub. Sure enough, uponlanding at Bend, I verified that the red liquid was indeed coming from the right prop hub.As I write this, the prop is at the prop shop being torn apart. The verdict isn't yet in,but one theory is that the source of the leak may turn out to be a tiny fatigue crack inthe retention nut that secures the #2 blade to the hub.
While all this was happening, I was deeply immersed in the ongoing TCM CSB 99-3crankshaft debacle. Early in 1999, TCM became aware of seven crankshaft fatigue failuresin factory reman 520- and 550-series engines. These failures were extraordinary forseveral reasons: they all occurred in new Vacuum Arc Remelt (VAR) cranks with very low time, and they alloccurred in virtually identical locations in relatively low-stress areas of thecrankshaft. Forensic investigation revealed that the failures had been caused by a stressriser created by a faulty tool used to press counterweight hangar bushings into thecrankshaft during manufacture. The result was a massive inspection program affecting theentire 1998 production of new and reconditioned 470/520/550 crankshafts, and the scrappingof nearly 15% of those crankshafts.
So, with my airplane AOG and propless, and my e-mailbox full of messages fromdisgruntled TCM engine owners, I decided to do some reading on the subject of metalfatigue. It turned out to be a pretty interesting subject.
One of the best write-ups on this subject to be found anywhere appears in JohnSchwaner's "Sky Ranch Engineering Manual," available from Sacramento Sky Ranch Inc. ($19.95,1-916-421-7672). Much of the following discussion is derived from material in Chapters 1and 7 of this excellent book.
Stress and Strain
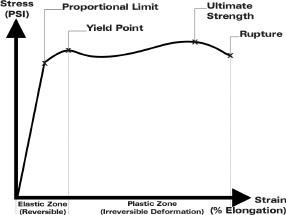
Consider what happens when you apply force to a piece of metal: It deforms. The forceyou apply is called stress, and the amount of resultant deformation is called strain. Therelationship between stress and strain is what defines the structural properties of themetal. (See Figure 4.)
The deformation of a metal part in response to stress may be either elastic or plastic.Elastic deformation is temporary — when the stress is removed, the metal returns to itsoriginal shape. The flexing of an airliner wing or the spring steel main landing gear on asingle-engine Cessna are examples of elastic response to stress. The slope of thestress/strain curve determines the elasticity (stiffness) of the metal.
When metal is stressed beyond its elastic limit or yield point, the result is permanent(or plastic) deformation — when the stress is removed, the metal does not return to itsoriginal shape. The ability of metal to be bent, stamped, forged or extruded into adesired shape — as well as its ability to bend before it breaks — are the result of itsplastic properties. On the other hand, once a metal part is placed in service, it'sobviously important that it not be subject to stress in excess of its yield point.
When you think about it, this combination of elastic and plastic properties is whatmakes metal behave like ... well ... metal. Many other familiar materials — whetherflexible like rubber or brittle like glass — are almost entirely elastic at ordinarytemperatures, and become plastic only when heated. Other materials like clay or putty havelittle or no elasticity, and deform permanently with the slightest force.
Tension and Compression
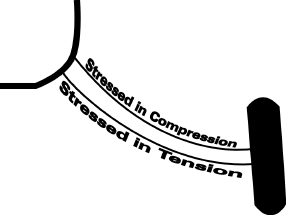 Figure 5 — Bending loads on a spring steel landing gear result in both tension and compression stresses. |
When we think about applying stress to a metal part, we usually think in terms oftension — in other words, applying a load that tries to pull the metal apart. Cylinderstuds and crankcase through-bolts are examples of metal parts that are loaded in tension.Aluminum alloys may have tensile strengths between 20,000 and 80,000 PSI, whilehigh-tensile-strength steel can withstand 200,000 to 400,000 PSI or more.
If a metal part is subject to tensile stress in excess of its elastic limit, it maystart to crack. Over time, the crack may grow to the point that the part fractures in two.
Tension isn't the only kind of stress, however. We may load a metal part incompression. Sufficient compression stress may exceed the elastic limit and result inpermanent deformation of the part. However, metal normally doesn't have a well-definedyield point in compression, so compression doesn't normally cause cracking or fracture.(Extremely hard and brittle metals may shatter under excessive compression, however.)
In real life, metal parts are often subject to complex combinations of tension andcompression stresses. When a part such as a wing spar or spring steel landing gear leg issubjected to bending loads, for example, certain areas are stressed in tension while otherareas are stressed in compression. (See Figure 5.) The same is true of parts subjected totorsion or shear loads. In such cases, we tend to be more concerned with the areas of thepart subjected to tension, because those are the areas that are most likely to crack andfail.
Stress Concentration
When a metal part is placed under load, stress is almost never uniformly distributedthrough the part. Instead, it concentrates in certain areas. Naturally, those areas ofstress concentration are where the part is most likely to crack or fracture.
When a part is subject to bending or torsion loads, almost all of the stress (tensionand compression) occurs at the surface of the part. That's why many airplane parts arehollow rather than solid. A hollow tube is very nearly as strong as a solid rod of similarsize, but the hollow tube is much lighter in weight. . The principal disadvantage of ahollow part is that, if stressed beyond its elastic limit, it tends to fail much moresuddenly and catastrophically than a solid part.
The same principle explains why I-beam and C-beam structures (commonly used for wingspars) carry virtually all their load in the top and bottom "caps," and verylittle in the "web" area that connects the two. It also explains why it's possibleto put "lightening holes" in parts without weakening them significantly
Stress is also concentrated at — and magnified by — any geometric discontinuities inthe part, such as corners, holes, notches, threads, scratches, nicks and pits. Suchdiscontinuities are commonly referred to as "stress risers" and are almostinvariably where fatigue cracks begin. (See Figure 6.)
Think about the last time you struggled to rip open a bag of potato chips or peanuts,for example. The thin plastic or cellophane material of the bag is nearly impossible totear unless you're fortunate enough to locate the tiny "open here" nick — or tocreate such a nick yourself with a pocket knife or your teeth. The nick concentrates thestress enormously, and makes the bag easy to open.
So it is with metal: A tiny and seemingly innocuous nick, scratch or pit may act as astress riser that concentrates the surface stress enough to cause the part to crack andultimately fracture. Simple surface roughness may be enough to weaken a partsignificantly, which is why highly stressed parts are usually machined or polished to asmooth finish. In time, corrosion pits may mar this smooth surface enough to permitfatigue cracking to begin.
Metal Fatigue
Take an ordinary paper clip, straighten, and then bend it back and forth repeatedlyuntil it breaks in two. What happened? You just demonstrated metal fatigue.
If you'd examined the bend point of the paper clip under a microscope as you bent itback and forth, you'd have seen one or more microscopic fatigue cracks develop on theoutside radius of the bend — the portion subject to tension stress. As you repeated thebending cycle over and over, you'd see the crack grow with each cycle until the paper clipfinally fractured.
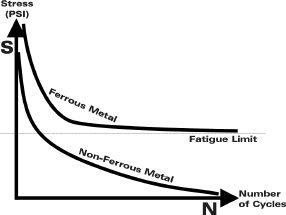
Surprisingly, it is not necessary to stress a metal part beyond the yield point inorder to generate a fatigue failure. Fatigue cracks can develop even when stresses remainwell within the elastic limit of the metal, given enough cycles. The lower the stresslevel, the more cycles it takes before a fatigue fracture will occur. This can be plottedin the form of what engineers call an "S/N curve." (See Figure 7.)
A heavily loaded steel part can be expected to endure ten million cycles or so beforefailing from metal fatigue. That might sound like a lot, but a connecting rod, crankshaftthrow or cylinder hold-down stud gets that many cycles in about 140 hours of flight time.
With steel, there is a stress level below which fatigue failures do not occur: the fatiguelimit. A part loaded below the fatigue limit may eventually develop fatigue cracks,but they won't grow to the point of fracture. Therefore, a steel part (such as acrankshaft) can theoretically remain in service forever, provided it doesn't corrode orwear beyond service limits.
In sharp contrast, aluminum and other nonferrous metals have no fatigue limit. Nomatter how low the stress level, eventually the metal will suffer a fatigue failure if itis subjected to enough cycles. This means that aluminum parts are inherently life-limited.For some parts, such as wing spars, the frequency of stress cycles may be so low that thepredicted life is ridiculously long. But for high-cycle parts, such as cylinder heads,crankcase halves and propeller blades, the fatigue life is very significant, as my cracked#5 cylinder head demonstrated.
Torque and Preload
It is crucial for fasteners that undergo cyclic tension loads — such as crankcasebolts and cylinder hold-down studs — be torqued properly to ensure that they don'tfatigue and fail. Here's why.
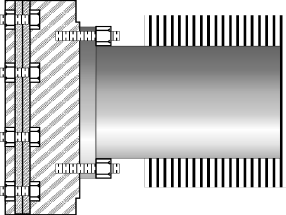
Consider the cylinder whose flange is attached to the crankcase by studs and nuts, asillustrated in Figure 8. Each time the cylinder goes through its compression and powerstrokes, the cylinder tries to pull away from the crankcase. At a peak cylinder pressureof 1,000 PSI, each firing load on a 5.25-inch bore is over 20,000 pounds. Since there areeight hold-down studs for each cylinder, each sees a peak load of around 2,500 pounds. Atcruise RPM, this happens 1,200 times a minute. Imagine that the cylinder hold-down nutswere torqued to establish a "preload" of only 2,000 pounds. During eachcombustion cycle, at the moment of peak stress, the stud would be subject to cyclic stressof an additional 500 pounds, which might cause the stud to elongate slightly (inaccordance with the stress/strain curve). This is a bad thing for two reasons: Thecylinder base flange and crankcase mounting pad will be subject to fretting, and thehold-down studs will experience stress cycles that could eventually result in fatiguefailure of the studs.
On the other hand, suppose the cylinder hold-down nuts were properly torqued toestablish a preload of 3,000 pounds. Now, even under peak stress conditions, the cylinderbase flange remains firmly in contact with the crankcase mounting pad. The hold-down studsremain under a constant 3,000 pound stress, and are not subject to cyclic fatigue cycles.
Believe it or not, broken cylinder hold-down studs may be caused by something asinnocuous as paint! It is essential that no paint be applied to thecylinder-to-crankcase mating surfaces, or to the cylinder mounting flange where thehold-down nuts attach. If any paint is present when the hold-down nuts are torqued inplace, the paint film will eventually wear away, relieving some of the initial fastenerpreload. If the preload decreases to less than the peak cyclic stress, then fatigue cyclesand fretting damage may occur.
Propeller spinners and spinner bulkheads are also places where inadequate preload isoften responsible for fatigue failures. These parts are subject to extreme vibration, andrequire sufficient preload to overcome cyclic stress that can result in fatigue failure.In most McCauley constant-speed prop installations, spinner preload is adjusted withfiberglass shims inserted between the propeller dome and the forward spinner bulkhead.When fatigue cracks occur at the spinner or aft bulkhead, it's almost always because thereare not enough shims installed to provide the necessary preload.
Internal Stress
Another way to help protect parts from fatigue is to build them with built-in stressthat counteracts some of the externally applied stress that results from loading. Sincefatigue is always caused by tensile stress, generally at the surface of a part, fatigueresistance can be increased by inducing internal compressive stress at the surface.
One way of accomplishing this is to compress the surface material of the part bysubjecting it to high-pressure rollers or shot peening. Rolling is commonly used toincrease the strength of propeller blades and to create high-strength threads, while shotpeening is used on high-stress engine parts such as connecting rods.
Another technique is called "nitriding," and used to caseharden crankshafts,camshafts, cylinder barrels, gears, and other highly stressed steel parts. The parts arebaked in an oven in an atmosphere of ammonia gas. The heat releases atomic nitrogen fromthe ammonia, and the nitrogen combines with the metal at the surface and to a depth of.020 inch or so. Since the nitrogen atoms occupy normally vacuous space in the crystallinestructure of the steel, they produce compressive internal stress that increases strength,hardness, and resistance to wear and fatigue.
A nitrided part such as a crankshaft is best thought of as being like an egg: arelatively elastic core surrounded by a very thin, very hard, very brittle case. The outernitrided layer gives the crankshaft greatly improved wear-resistance. However, just likean eggshell, the brittle "nitride case" can crack easily if subjected toexcessive pressure (which is exactly what caused the recent massive TCM CSB 99-3crankshaft recall).
Furthermore, while fatigue cracks normally occur at the surface of a metal part wherethey can readily be detected, a nitrided or shot-peened part may develop subsurfacefatigue cracks that cannot be detected during visual or dye penetrant inspections. This iswhy sophisticated non-destructive testing (NDT) techniques such as ultrasound and X-raymust often be used to inspect these parts for fatigue.
What's It All Mean?
Our metal airframes, engines and propellers are made from an eclectic combination ofmaterials with widely varying characteristics. Steel parts — like crankshafts andaccessory gears and tubular engine mounts — should theoretically be able to remain inservice forever, provided they are loaded below their fatigue limits, and protected fromexcessive wear, damage and corrosion. Aluminum parts, on the other hand, have no fatiguelimit. If they are subject to cyclical stress (as most are), they have a finite servicelife and must be inspected regularly for fatigue cracking.
Cylinder heads are particularly vulnerable to fatigue failure, as I found outfirsthand. If you think about it, cylinder heads have just about everything going againstthem, fatigue-wise. They're subject to an extraordinary amount of cyclic stress. They'remade of aluminum alloy so they're inherently life-limited. They operate at hightemperatures, which lowers the yield point of the metal and accelerates the effects offatigue. (The fatigue strength drops rapidly with increasing temperature, particularly asCHTs rise above 400 F.) They're manufactured with roughsurfaces and machined with cooling fins and threaded areas and all sorts of holes, all ofwhich provide stress risers where fatigue cracks can originate. And, they're constantlybathed with hot and highly corrosive exhaust gas which further weakens and pits thesurface of the head, particularly in the exhaust port area where many head cracks start.
Frankly, it's amazing that they last as long as they do.
An old rule of thumb states that once a cylinder has made it through two TBOs, thelikelihood of fatigue cracking increases significantly. The published TBO for myTSIO-520-BB engines is 1,400 hours, which puts my 3,000-hour jugs a bit beyond twice TBO.So you could say that my cracked #5 cylinder head occurred right on schedule, so to speak.
The question is: Was this a fluke, or are the other 11 cylinders going to follow suitbefore long?
It's not worth trying to get heroic with weld repairs to a cylinder heads of thevintage that mine are. Best to accept the fact that they're long in the tooth and bound togive up the ghost sooner or later — probably sooner. Between now and major overhaul time,I'll have to watch my jugs like a hawk for the tell-tale signs of fatigue cracking —mainly subtle fuel and oil stains where there shouldn't be any, and cooling fins that go"plunk" instead of "ping!" With luck, I'll nurse ‘em along‘til overhaul time, at which point they will wind up as scrap metal to come back assomebody's Coca-Cola can.
What about my cabin step support casting that nearly fractured from fatigue? There aresome lessons learned there, too. Although this part is buried under the floorboards andvery difficult to inspect, it is subject to extreme cyclical stress every time someoneenters or leaves the cabin. The casting is made of magnesium, a material that is moregranular and brittle and prone to rapid cracking than aluminum. The crack originated at asharp corner of the casting that was not properly radiused during manufacture to minimizethe stress concentration at that point ... but it is now, after I spent an hour filing andpolishing it before reinstallation!
Most importantly, this casting was out of sight and out of mind. It wasn't on anyCessna 310 annual inspection checklist, and none of the experienced twin Cessna mechanicsI talked to remember ever making a practice of trying to inspect it. That's going tochange, at least on my airplane.
Postscript
As for my propeller hub that started throwing red-dyed oil, the problem turned out notto be fatigue-related after all. Instead, it turned out to be caused by loss of torque onthe #2 blade retention nut, caused by — can you guess? — the presence of paint onthe threaded area of the hub when the prop was assembled during the previous overhaul.Turns out that the prop shop had hired a new fellow in its paint shop, and apparently hedidn't realize that it was a no-no to paint the hub threads. The paint film gradually woredown, causing a loss of preload, and could have developed into a life-threateningsituation if not detected early. The problem didn't show up until three years after theoverhaul, in the form of a tiny leak of the red-dyed oil that's there specifically to makehub cracks detectable. Much to its credit, the prop shop re-overhauled both of my props atits expense.

